
SHIN-OLLIE How To ~New Textbook of Ollie~
[Notice]
English on this site was translated from Japanese by Google. There may be translation mistakes.
The trick that everyone wants to do when they start street skateboarding is “Ollie”.
It’s a technique that floats in the air as if the board is sticking to your feet.
先月のオーリー pic.twitter.com/RDVeOvC6Uw
— Takkks|Sk8HowTo (@Takkks_SK8) June 30, 2020
The other day Ollie
In order to confront this biggest wall and eternal challenge, I would like to share my own method and practice procedure named “Shin Ollie HowTo ~New Textbook of Ollie~”.
Let’s do it!
コンテンツ
- 1 Attitude to challenge Ollie
- 2 Understand the logic of Ollie firmly
- 3 Before challenging Ollie
- 4 Foot position and center of gravity of the body
- 5 Get used to acting on the board
- 6 How to hit the tail
- 7 Let’s Ollie
- 8 Let’s Ollie while running
- 9 How to move the front leg
- 10 Landing
- 11 Think from the perspective of the board
- 12 Other Notes(Addition from time to time)
- 13 Summary
Attitude to challenge Ollie
#スケボー初心者、オーリー習得心得
①とりあえず10000回やる
②とりあえず半年やる
③練習と研究
④めちゃくちゃプッシュする
⑤それぞれの過程を楽しむ pic.twitter.com/sP7BiQVbDk— Takkks|Sk8HowTo (@Takkks_SK8) August 6, 2021
1. Do it 10,000 times for the time being.2. Continue for half a year for the time being.3. Practice and observe.4. Push insanely.5. Enjoy each process.
I will try my best to explain it after this, but there is no shortcut to learning Ollie. This is because you can improve and learn by repeatedly practicing similar movements and creating muscle memories.
Although it is in the tweet above, for example, if you hit the tail 10,000 times in half a year, you will have to do it at a considerable practice pace. It is important to have the guts to continue and the feeling of having fun.
But you won’t know until you try this, so feel free to start it for the time being!
Understand the logic of Ollie firmly
The principle itself is very simple. It is the principle of leverage.

1. Apply force to the tail to flip up the nose.
2. Apply force to the nose to flip up the tail.
3. Raise your legs and body so that they do not interfere with the tail and nose, respectively.
That’s all, but make sure you understand it.
It is as follows..
オーリーせずに再現するとこうなる
How #ollie works pic.twitter.com/514BUDjpFy— Takkks|Sk8HowTo (@Takkks_SK8) November 25, 2021
Did you recognize the actual operation?
And the important thing is to get the deck to “move this way”.
You are the one who moves the body for Ollie, but at the same time, it is important to have the perspective that the board itself moves according to the logic.
* No need to practice the action of the above video.
Before challenging Ollie
First of all, let’s definitely master Push and Tic-Tac.
Push should be stable and speedy. Get used to the wobbly board, support the entire body weight with front foot, and kick the ground with all your strength, including the hip joint, thigh, knee, calve, ankle, and toe of the hind foot. Push hard daily and continue to train the leg strength required for Ollie.
Tic-Tac is an essential movement to acquire a sense of stability that does not upset the balance when the board tilts or changes direction.
Also, try jumping on the board, straddling a branch while running, going down the steps, turning 180 ° with the front foot as the axis, etc. If you can make such basic movements, you will be able to handle the board better. Try them at the same time you practice Ollie.
オーリーの前にやっておくといいコトいろいろ
オーリーは「基本トリック」ではあるけれど、その前に「スケボーの基礎の“き”」みたいな動きが山ほどある。オーリーやりながらでいいのでいっぱい覚えとくと、それだけで板に乗るのが楽しくなる。板と仲良くなると上達も早いっす◎ #スケボー初心者 pic.twitter.com/ZGzPqYEP8l
— Takkks|Sk8HowTo (@Takkks_SK8) August 26, 2021
Various actions that should be done before Ollie.Ollie is a “basic trick”, but before that, there are many actions that are “basics of skateboarding”. It’s okay even while practicing Ollie, so the more you get the basics in parallel, the more fun it will be to get on the board. The more you get along with the board, the faster you will improve Ollie.
In short, by continuing these basic movements, the entire leg, trunk, and inner muscles are trained. I wrote earlier that there are no shortcuts, but the more you get used to them, the better it will be for learning Ollie. It’s better if you can run through streets without any inconvenience.
#オーリー の前に(or並行して)やっておくといいコトいろいろ その2
小さな段差やブロック、バンク、ミニランプで遊ぶ編。オーリーとショービット練ばっかだと心折れがちなので🙃 #スケボー初心者 pic.twitter.com/PlgKr5uSMc
— Takkks|Sk8HowTo (@Takkks_SK8) November 18, 2021
Various actions that should be done before Ollie #2
Foot position and center of gravity of the body

There is no correct answer for the foot position, but try first this.
Hind foot is important. Place the center of the tip of the tail in a position where you can hit it with your toe or a ball of the foot. Do not let the toes of both feet stick out of the board.
The center of gravity of the body (=head position) is from the middle of both feet to the center of the board. So it puts some weight on the front foot. And the board keeps horizontal so that it does not tilt to the toe side or the heel side. Ride a little on your toes instead of riding on the soles of all your feet.
It would be nice to be able to squat lightly from that state and jump lightly on the board, but it is difficult at first. After practicing repeatedly, you will be stable when your leg strength and trunk are strengthened by Pushing and Tic-Tac.
The point is not to move your head in any position. The head only goes up and down. Do not move it back and forth and left and right.
As much as possible, straighten your posture and do not lean forward or curl your back to look into the board when you bend down. And it is not good for either shoulder to go down while moving. Keep horizontal.
* I don’t think you need to bend your knees deeply before jumping. Regardless of skateboarding, you don’t bother to bend your knees deeply when you just jump, right?
Get used to acting on the board
こういうのもやってみる。
少し屈んでからふわっと軽く跳んで板から体重を抜き、ノーズを上げ、まっすぐ着地。
足だけでなく体全体を上げる。ジャンプとノーズが上がるタイミングを合わせる。跳んだときに腰や膝が曲がらないように。
テールは地面に付けなくてOK。 pic.twitter.com/0oQ7rdsrs5— Takkks|Sk8HowTo (@Takkks_SK8) August 9, 2021
[tweet above]Once you have learned foot position and center of gravity of your feet, try something like this.
Do not move your head even if the board tilts, and keep your body axis vertical. Spread your arms and keep your shoulders horizontal. Be aware of the movement of the center of gravity of both feet. Repeat over and over again until stable.
[tweet below]
Try something like this.
Bend down a little, then jump lightly to remove weight from the board, raise the nose, and land straight. Raise not only your legs but your entire body. Match the timing of jumping and raising the nose. Don’t bend your hips or knees when you jump. You don’t have to attach the tail to the ground.
It doesn’t hit the tail or rub the nose from the beginning. First, get on the board and try the actions of the above two videos. You will get used to raising the nose and floating your body on an unstable board. Especially the action of the second video is very important.
For those who are struggling with Ollie, I first point out: “It’s not only a matter of raising the board and the legs, but also raising the whole body.” and “Matching the timing of the rise of the nose and the rise of the body”. Master it well. Let your body remember it.
As I wrote in the “Logic of Ollie” section above, this is an exercise to prevent your feet and body from getting in the way of the board that pops up. It’s not good that the board floats while the body doesn’t.
* Instead of jumping with only your hind leg, use both legs to lift your entire body.
How to hit the tail
次に弾き方。
足首のスナップを使って一瞬で弾く。ピックアップをより強くする感じか。
地面を力ずくで蹴ったり、テールを押しつけるほど踏みこんだりしない。 #オーリー pic.twitter.com/Snlf4Xte7h— Takkks|Sk8HowTo (@Takkks_SK8) August 10, 2021
Hit with an ankle snap in an instant. It might feel like making pickup stronger.Don’t forcefully kick the ground or step on the tail.
Get off the board and get the feeling of hitting the tail.
Do not step on the ground so much that it exerts force or weight directly on the ground. Release your foot up before the tail hits, or just lightly hit it. It will take some time for the body to remember the distance and timing between the road surface and the tail. It is desirable to always be able to operate properly.
One thing to keep in mind is to hit “the one point at the tip” of the tail.
When they say “hit the tail”, you may vaguely think of a “plane” from the shape of the tail. But, the important thing is to hit the tip of the tail and have the image of it bouncing back. It is not the “plane” but the “point” that should convey the force.
As shown in the video above, it is better for the board to jump up into the air. Quickly flip up the nose, and practice with an awareness that it is related to Logic of Ollie “2. Apply force to the nose to flip up the tail”.
The snap of the ankle will strengthen the instantaneous power by continuing to push hard.
Let’s Ollie
(ここからいきなりのオーリー笑)
弾くことで跳ぶのではなく、2つ前ツイのふわっと跳んだところで弾く。とにかくノーズの上がりと体の上がりのタイミングを合わせる。
はじめは板を平行にしなくていいので、抜重&自分のジャンプ+弾きだけでオーリーできるとよい pic.twitter.com/ue9lRu9CrZ— Takkks|Sk8HowTo (@Takkks_SK8) August 10, 2021
Instead of jumping by hitting, hit at the timing when you jumped softly in the previous tweet video. Anyway, match the timing of the rise of the nose and the rise of the body.
At first, you don’t have to level the board, so remove your weight from the board and try to Ollie just by jumping and hitting the tail.
As mentioned above, the action of lifting the body and raising the nose while removing the weight, and tapping the tail lightly with that flow.
You don’t have to jump hard or kick the ground with all your might. Raise your body, stretch your whole body, and when the weight on the board is released, use the snap of your ankle and tap it so that it makes a clicking sound.
Ideally, when you hit the tail, your hips are higher than when standing upright. If your body is stretched and raised, your hips will rise automatically, but at the beginning, it is often lower than when you are upright. As I wrote in the previous section, lift your body with both feet and then hit.
If the tail does not hit the ground easily, try placing your front foot closer to the tail.
*As you can see in the “Logic of Ollie” video, you don’t have to stick firmly the board and your feet together. It’s also okay to hit the tail when your body floats in the air and your legs and board are about to separate.
Do not bend your back, hips, or knees when you hit and jump. If the jump and timing are right, the tail should hit just before the whole body is fully stretched.
Let’s Ollie while running
走りながらやるにはとにかく数。数を打つ。止まりそうな速さから始めればいい。
まずは軽くふわっと体が上がればいいので深く屈む必要はなし。
この段階では前足は真上に上げるだけでOK。ためしにちょっと足首を寝かせてみてもよい。 pic.twitter.com/f9giytFuz3— Takkks|Sk8HowTo (@Takkks_SK8) August 13, 2021
To Ollie while running, do a lot of times. Start at a very slow speed as if it weren’t moving.
First of all, you only have to lift your body lightly, so you don’t have to bend down deeply.
At this stage, just raise your front foot straight up. You can also try bending your ankles outward a little.
Once you get used to standing Ollie, try hitting the tail while running little by little.
But…
…Stopping Ollie and running Ollie are completely different, which is very difficult… At first, it is better to gradually get used to it from a slow speed just before it stops. Do not move your head except up and down.
If you can’t Ollie, just raise your body and nose without hitting the tail. Do it steadily.
* Again, if the “skateboard muscles” are trained by pushing, Tic-Tac, jumping on the board, etc., the running Ollie will become stable.
How to move the front leg
で、前足の動かし方。
前述の通り、まずは前足を真上に上げるだけでOK。
このときにスネを斜めに倒し、さらに足首の力を抜いて寝かせ、上げる。
体の上げとノーズ上げのタイミングが合っていれば、前足はノーズに当たる。 #オーリー pic.twitter.com/8SOFHasI9P— Takkks|Sk8HowTo (@Takkks_SK8) August 14, 2021
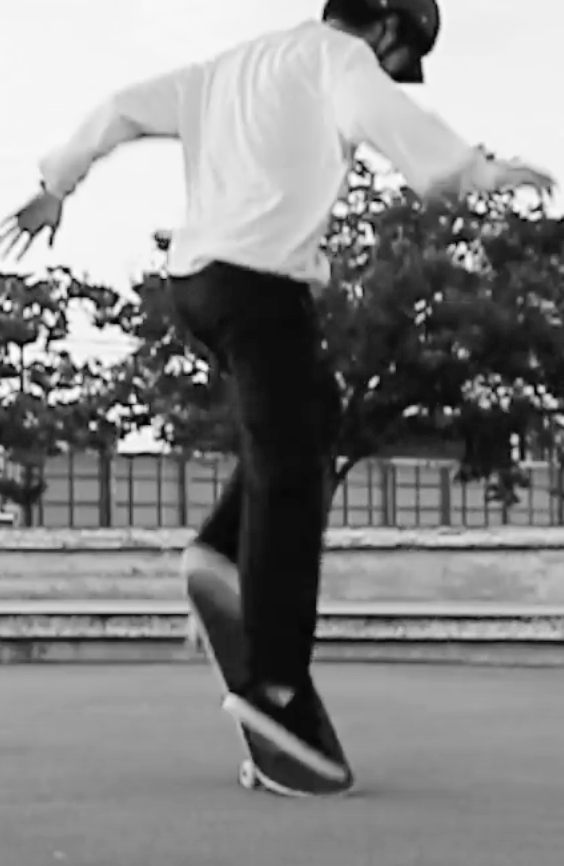
As mentioned above, first just raise your front foot straight up.
At this timing, tilt the shin diagonally, relax the ankle, lay it down, and raise it.
If the timing of raising the body and raising the nose is correct, the front foot will reach the nose.
Before pushing out the nose, make it a habit to tilt your shin and relax ankle. With your knee facing outwards, your toe inside, and your shin tilted.
At this timing, Relax your ankle, lie down your toe, and apply the outside of the instep to the warp of the nose. (The area around the little finger of the shoe is rubbed and scraped.)
* It may be good to relax not only the ankle but also the entire area below the knee.
Repeat over and over, and once you get used to manipulating your shin and ankle, try pushing the nose little by little.
So far, you’ve pulled the deck up and up with Logic of Ollie 1’s “flip up the nose” and “lift your body”.
Finally, Logic 2, flip up the tail to level the deck…

When the shin is tilted, the protruding knee is used as a fulcrum, and the tip of the foot that was placed inside is moved straight outside the knee. While pushing out the foot, return the angle of the toe that was laid down so that it turns over.
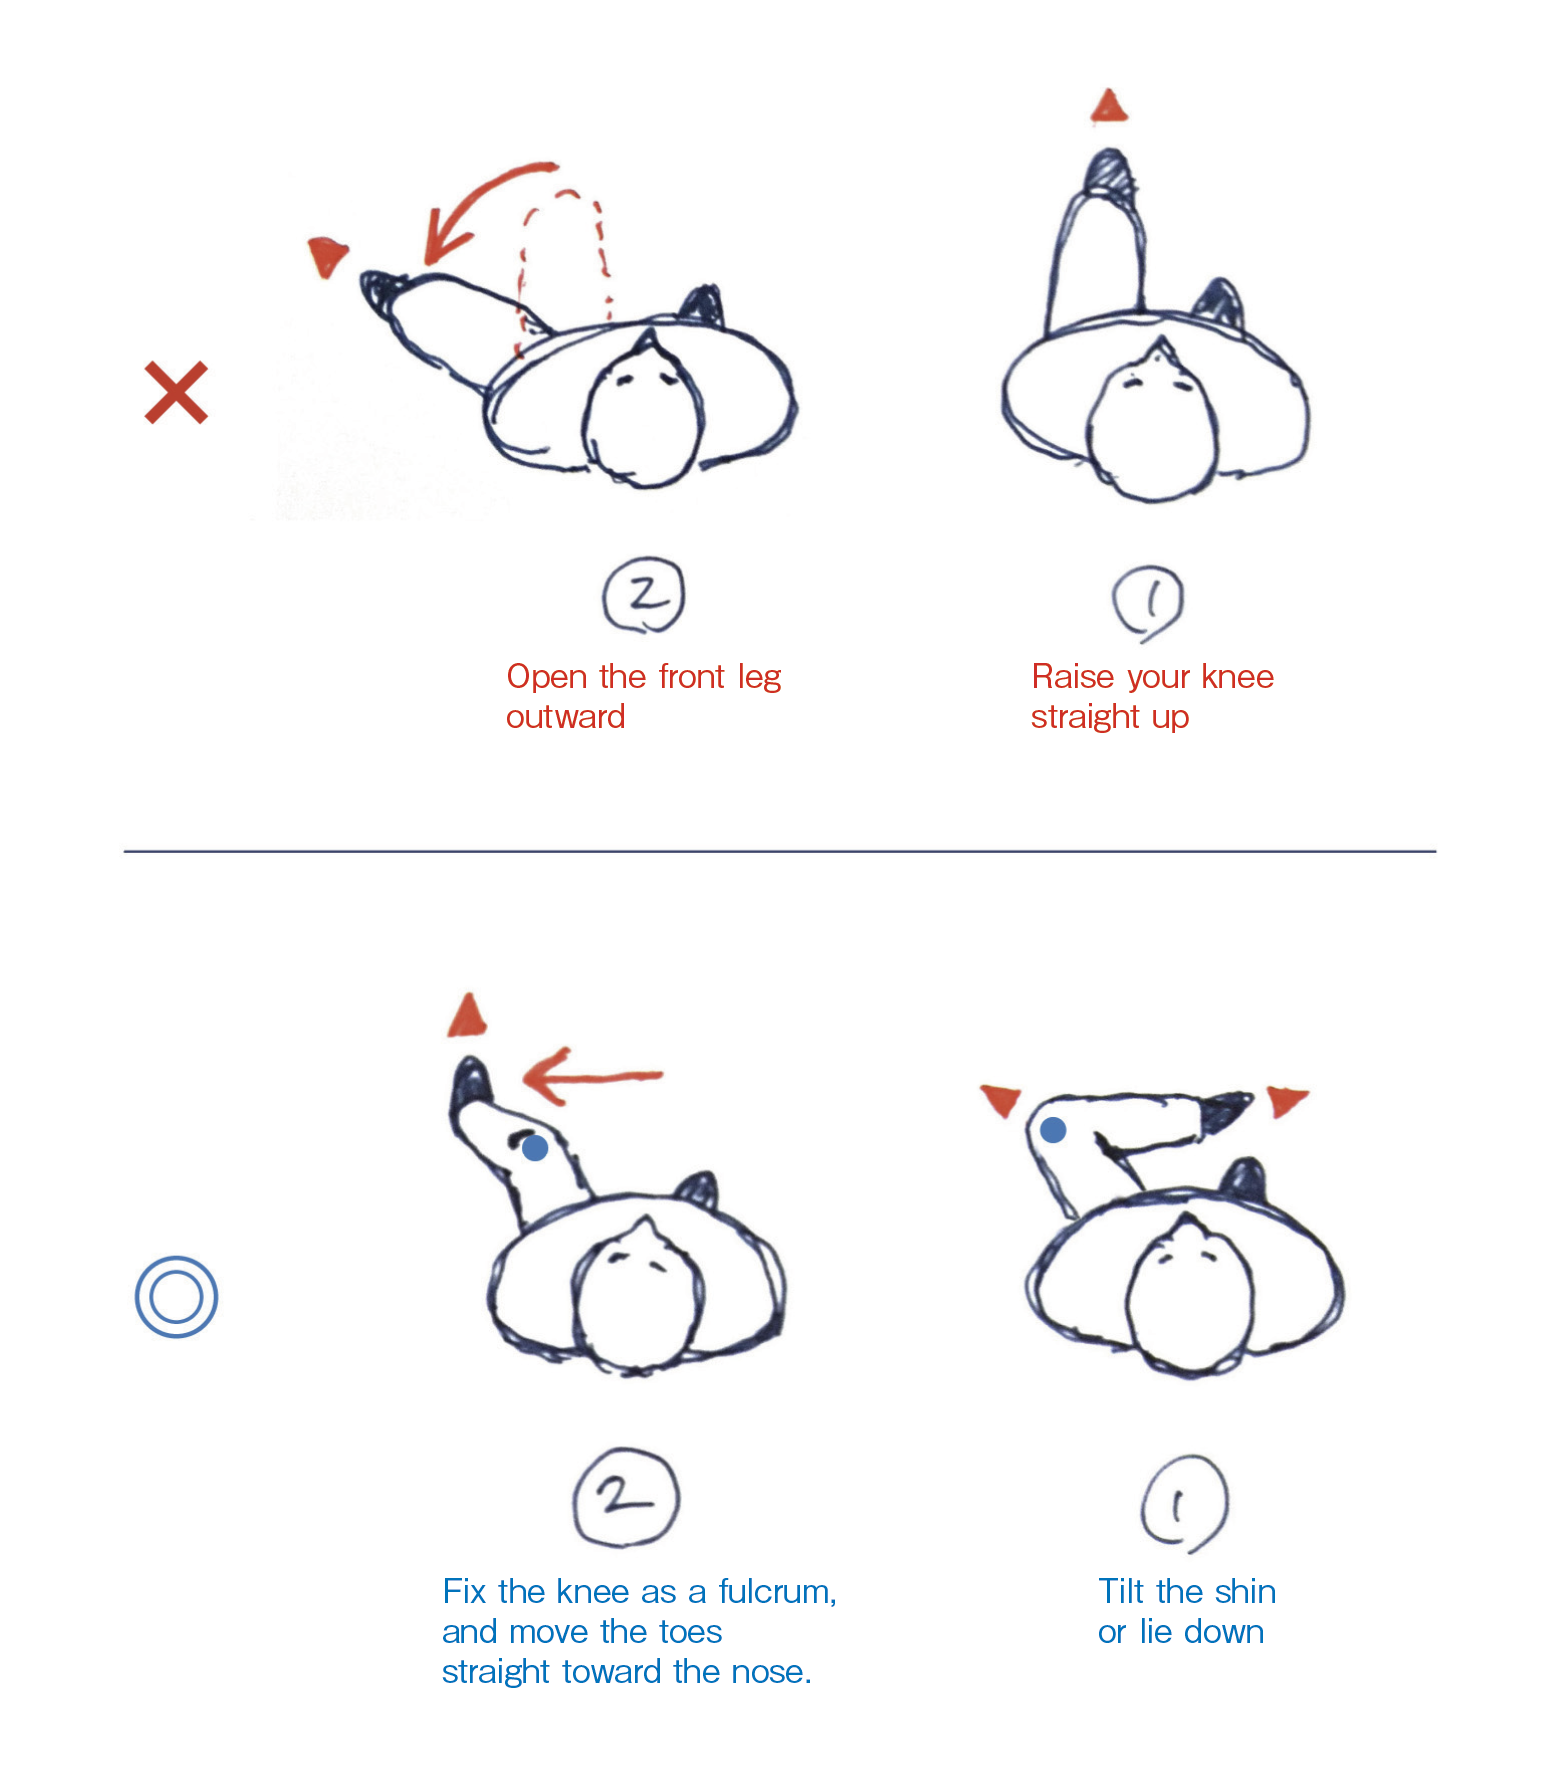
* Many people raise their knee vertically without tilting their shin and then open their leg outward, but this should not be done.(Since the nose cannot be pushed straight, it may cause the board to be angled to the front side when landing.)
より高く跳んで、もっと押す。
前足を真上に上げてから、ノーズ先端を30〜40cm一気に進行方向へ押す。
ジャンプの“ピークに達するまで”に押し終えることで、前足を支点にテールが上がり、板が平行になる。
(ピークに達してから押してしまうと、後ろ足を支点に板が平行になるので良くない) pic.twitter.com/4VMPfJNuJi— Takkks|Sk8HowTo (@Takkks_SK8) August 16, 2021
[tweet above]
First, try pushing out the nose lightly. Relax below your knee, push the nose while returning the tilted shin and ankle to the vertical position. You will feel the tail rise a little compared to when you don’t press the nose.
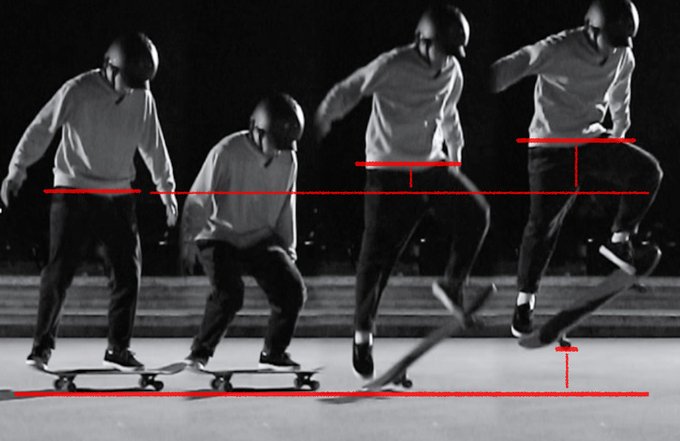
[tweet below]Jump higher and push more.
Raise your front foot(not knee) straight up and then push the tip of the nose forward 30-40 cm at a stretch.
By finishing pushing “until the peak” of the jump, the tail rises with the front foot as the fulcrum and the board become parallel.(If you push it after reaching the peak, the board will be parallel with the hind leg as the fulcrum, which is not good.)
It is best if you can finish pushing the nose while your body is rising and keep the posture that the boards are parallel for as long as possible at the peak.
If your body is raised, your front foot will reach the nose early. So it’s better to push it out as soon as your front foot passes the front screw.
If you have been able to raise your body well in the practice so far, you could have enough time to stay in the air to push your foot out(and have enough space under your body). Gradually increase the distance to move and increase the speed of movement.
The more you push your front foot, the faster the tail will pop up, so raise your hind foot accordingly.
Landing
Did the board become leveled cleanly?
After that, use the knee cushion to land on four wheels. If you do not raise your entire body, you will not be able to use your knees flexibly, and you will tend to land hard and heavy, or land from the front wheels.
Being able to land flexibly means that you are jumping correctly.
Think from the perspective of the board
As I wrote at the beginning, the point is that the board only needs to move according to “Logic of Ollie”.
オーリーせずに再現するとこうなる
How #ollie works pic.twitter.com/514BUDjpFy— Takkks|Sk8HowTo (@Takkks_SK8) November 25, 2021
Let the board make “this movement”. Move to make this movement. How should you move your legs and body to make the board like this? Think from the opposite.
It is especially difficult for beginners, but practice all the movements by thinking “to make the board make this movement”. Then, your Ollie may improve and your style may be completed.
Other Notes(Addition from time to time)
* It is better to practice jumping 20 to 30 cm lightly and cleanly rather than a full-powered Ollie. What is needed is not strength but timing and instantaneous power. As you improve, the height will automatically increase.
Summary
It’s been a very long article, but of course there is a long way to go to master Ollie. I want you to try various things other than Ollie and Shove-it, and ENJOY SKATEBOARDING. (If you keep practicing only Ollie and Shove-it, it’s probably very stressful.)
Ollie leads to 180 Ollie, Kickflip, 50-50 Grind, Board Slide … and many other tricks. By going back and forth between these tricks, your Ollie should improve even further.
* For example, 80-90% of Kickflip movements are based on Ollie, and improving your Ollie is the fastest way to learn it.
As you can see from my commentary videos, I’m never good at Ollie … I have knee pain, but I continue to practice to do Ollie more beautifully while dealing with the pain. Once you get the hang of it, you will be able to jump lightly, smartly, and not so painfully without using unnecessary force.
I will do my best as well.
written by @Takkks.